Developer's diary focused around 'Batman' project, mostly...
Prologue
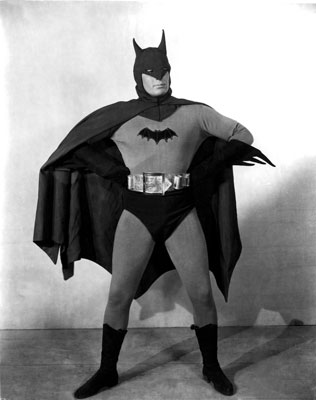
So it came to this that I have started a diary. I will try to put here all my thoughts and progress with the project I had really long time in mind, at least for 5 years - so as you see - I can be patient...
One may ask what is the point of all this. People are spending so much time on many things, mostly crap, so I have decided I will spend some of mine on this. If that doesn't convince you just try to look at it as at some cheap form of therapy.
The Batman theme is used here mostly as a guideline. It is not, that I'm so huge fan, that everything without a cape and long ears doesn't count. I choose it as a defined space for project - that way I can focus on certain aspects which have to be there anyway.
I hope it will be fun, as I will have opportunities to play some old games, watch some movies and read some comic books.
I'm always opened to suggestions and I love to talk about classic video games. If you do have any need to contact me, please write to andrzej@maziacs.com.
One more thing - sometimes you will notice that things are put NOT chronologically. That is mostly because sometimes I put some notes on the piece of paper and totally forget about them.
Inspiration
I remember when I was in High School I was really interested in doing games. Back then I had my Amiga 500 and a lot of games which I actually never enjoyed playing as much I taking them apart. I tried to hack every game which fell into my hands, check how they did the music - what music format, how many channels, rip the graphics, see how they stored the sprites in files and so on. The people behind Amiga games were usually very skilled and devoted hard working half-professionals, who had to juggle, twist and do many other tricks to make a game look so wonderful.
Video game consoles were never too popular in my country. It was hard to buy (almost impossible) an original game back then, so I knew SNES and Sega Mega Drive only from stories of a friend of a friend of a friend... of a friend of some rich boy, whose father worked abroad and send him some console for Christmas. At some point I was fortunate enough to get a cable television. There was one foreign station, where once in a week they talked for the WHOLE ONE HOUR about video games. As always I had my eyes glued to the screen as I was admiring things which I have never seen for real. I was almost crying, why they didn't do THAT for Amiga, and THAT, and THAT.
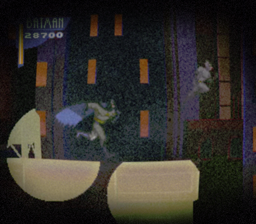
So once there was showed Adventures of Batman and Robin for SNES. I remember Batman chasing Catwoman over the rooftops in the searchlights. The screen was distorted first by a camera catching the TV with the game on the screen, then by my old TV, but still I wished I could play this game... With the help of my wicked image manipulation skills I tried to imitate the distorted screen, I think this is quite close to what I have seen back then.
Years later the emulators era has begun. I have checked Adventures of Batman and Robin for Sega Mega Drive and loved it. The game was absolute masterpiece in every way. It wasn't too hard as many say, the only problem was that if you got killed, you had to repeat from the square one, so it might get little repetitive.
Many years later I have found myself developing commercial video games for PC platform. Around that time GBA emerged. As a retro player and pixel art lover I wished I could do some games for GBA, but commercial development was out of the question. So I have started a homebrew. After some time I had pretty bold collection of tech demos, which are still waiting to implement them as a whole. So that is what this project is about.
Guidelines
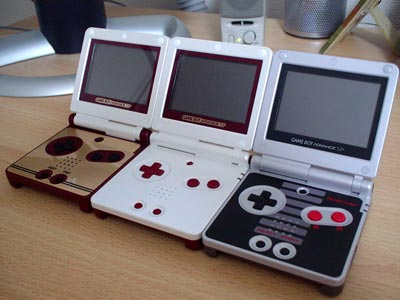
The project itself will be written for Game Boy Advance. It is powerful enough to do almost any Retro influenced game. Almost 90% of the commercial games are failing to fully take advantage of it. It has very solid, well designed architecture and is enjoyable to program. There are many tutorials, libraries and development environments, but one still can go well without them all.
Furthermore, it is a handheld, so I can get it with me and show almost anyone. It can be emulated almost perfect on every machine available, including other handhelds.
Actually this is my favorite video game console. I own GBA SP (nes edition) and GBA Micro. I also have most of the good games for it... all 20...
Photo courtesy of www.gearlive.com.
On the other hand, it is still very limited and I believe that all great things come from limitations.
-
Some raw details about the project:
- System: Game Boy Advance 'backlit' models. I'm not going to over burn colors, it should look good on DS.
- Number of players: One . Maybe in later stage I can include two player cooperative mode via cable.
- Sound: Stereo with headphones. We have stereo music and panning for sfx.
- Type: Platform, Racing, Minigame, just like all original Batman games had.
- Gameplay time: 6 hours total. Include some system to add some replay value.
- Number of levels: the more the better if there is no repetition.
FAQ
Q: When the game will be out?
A: When it is done.
Q: When the game will be done?
A: When there is satisfactory gameplay from start to finish.
Q: But this game looks like it was from 80's! Why?
A: Thank you. What was the question again?
Q: Why don't you just do the game for 3d hardware?
A: Kids these days..
Q: I have a nice idea, will you implement it?
A: I have quite a huge pile of ideas on my own, but sure, just send it. Probably it is already on my list, if so, don't claim later that it was your idea.
Q: Will be there a racing or flying sequence like in almost all video games with this subject.
A: Yes... No.. It's a secret! But you almost got me there.
Q: Can I help somehow?
A: Yes, you can. I need any help I can get, but bare in mind that this is still my project and it goes when I want it to go.
Q: Do you plan to make any money out of it?
A: No, it will be free.
Q: Can I have a source code?
A: No. I have shared quite a few sources in the past, this time it is different.
Q: What time is it?
A: It's ?.
Q: Why want you do it for PSP or at least DS?
A: Somebody hand me a shotgun, please!
Environment
@TODO: TONC - as I still have problems with installation.
Music
So I'm listening to some *.GBS music files right now. I'd be lying if I'd said that I really enjoy it. There is a story to it, so let's start from the beginning...
Over the years the number of Batman movies along with games reflecting them grew. Actually same goes for style, but for now lets stick to the music.
Below there is a list of movies, where Batman as (or one of) the main character appeared, along with music authors (probably little incomplete).
You will be surprised how long it is - I was...
- 1943 - 'Batman' - serial - Lee Zahler
- 1949 - 'Batman and Robin' - serial - Mischa Bakaleinikoff
- 1960 - 'Batman' - serial - Neal Hefti
- 1966 - 'Batman: The Movie' - film - Nelson Riddle, Neal Hefti
- 1989 - 'Batman' - film - Danny Elfman
- 1992 - 'Batman Returns' - film - Danny Elfman
- 1995 - 'Batman Forever' - film - Elliot Goldenthal
- 1997 - 'Batman & Robin' - film - Elliot Goldenthal
- 1992 - 'Batman: The Animated Series' - anim serial - Danny Elfman, Shirley Walker, Lolita Ritmanis, Michael McCuistion
- 1993 - 'Batman: Mask of the Phantasm' - anim film - Shirley Walker
- 1998 - 'Batman & Mr. Freeze: SubZero' - anim film - Michael McCuistion
- 1999 - 'Batman Beyond' - anim serial - Kristopher Carter
- 2000 - 'Batman Beyond: Return of the Joker' - anim film - Kristopher Carter
- 2001 - 'Justice League' - anim serial - Kristopher Carter
- 2003 - 'Batman: Mystery of the Batwoman' - anim film - Lolita Ritmanis
- 2004 - 'The Batman' - anim serial - Thomas Chase
- 2005 - 'The Batman vs. Dracula' - anim film - ???
- 2005 - 'Batman Begins' - film - Hans Zimmer, James Newton Howard
- 2008 - 'The Dark Knight' - film - Hans Zimmer, James Newton Howard
- 2008 - 'Batman: Gotham Knight' - anim film - Christopher Drake, Robert Kral, Kevin Manthei
- 2008 - 'Batman: The Brave and the Bold' - anim serial - Kristopher Carter, Lolita Ritmanis, Michael McCuistion
- 2008 - 'Justice League: The New Frontier' - anim film - Kevin Manthei
- 2009 - 'Superman/Batman: Public Enemies' - anim film - Christopher Drake
- 2010 - 'Justice League: Crisis on Two Earths' - anim film - James L. Venable, Christopher Drake
- 2010 - 'Batman: Under the Red Hood' - anim film - Christopher Drake
- 2010 - 'Superman/Batman: Apocalypse' - anim film - John Paesano
The game music was more or less accurate arrangement of the corresponding movie. In some versions the original melody had higher priority than the overall quality of the tune, in others the tune was greatly arranged even if it didn't follow closely the original. Of course there exist the third option: total crap which has no connection to original.
I remember 3 Batman games, which had music I particularly liked:
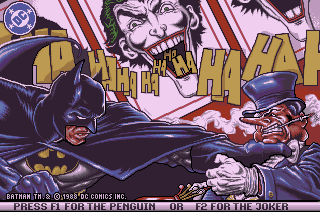
'Batman: The Caped Crusader' - Amiga - Keith Tinman - Although the game itself tries to imitate comic panels, the music is somehow based on 'Batman' (1960) TV series. It doesn't follow twelve bar blues progression as the original did, but still tries to add specific DaDaDaDaDaDaDaDa melody. As for today standards the music sounds really outdated.
More info about this game at
'Batman Returns' - Amiga - (unknown author) - The music itself doesn't follow directly the original score, but instead tries to imitate the style. It is simple but has some special depth to it. It uses synths and has really interesting composition. My wooden ears somehow caught there some Christmas carol melody along the lines.
More info about this game at
'The Adventures of Batman & Robin' - Sega Mega Drive - Jesper Kyd - The music doesn't follow the source in any way, in fact it could serve as a (good) soundtrack to any action game. It is fast, dynamic, violent synth based score. It has awesome quality and composition, pushes everything it can out of Sega's sound chips. It serves as a proof of concept, that different vision can still replace original concept.
More info about this game and soundtrack at SigmaEcho.
I have my idea of the feeling player should get during gameplay. I want him to think about it like the game which should be at the beginning of existence GBA, which uses synths, all special effects and fireworks this handheld could give. Something old school from die hard developers of 16 bit consoles.
I'd go with option ignoring original movie score if necessary, specially when I'm not sure if I really want to follow any of them. Most important thing is that listener should be aware that this is a video game, moreover a classic video game.
I think that there is no better way of doing a classic video game music, than to use synths or other special music chips. This finally gets us back to *.GBS music files.
Game Boy Sound System (hence GBS) music files are written with Game Boy hardware in mind. Original Game Boy and Game Boy Color includes 4 sound channels present on board.
Game Boy Advance has very same hardware as its predecessors with addition of two Pulse Width Modulators that act as 8-bit digital-to-analog converters. Actually both channels put together create Direct Sound in stereo. With that one can play WAV files or mix music on the fly from several channels.
| channel 1 | channel 2 | channel 3 | channel 4 | channel 5 | channel 6 |
|---|---|---|---|---|---|
| Sound 1 | Sound 2 | Sound 3 | Sound 4 | Direct Sound A | Direct Sound A |
| square waves with variable duty cycle, frequency sweep and envelope functions | square waves with variable duty cycle and envelope functions | 4-bit DAC that repeatedly plays a pattern of 4-bit samples | noise with an envelope function | 8-bit digital-to-analog converter | 8-bit digital-to-analog converter |
The original idea was to try to create convincing synth music using GB hardware, and additional GBA hardware to produce special effects, digitized sound or speech. In theory it sounds really nice, however in real world GB sound is not even close to sound I'd like to have. I think we will do just opposite - mix the music, so it sounds like synth and use GB for special effects, or enhancement of mixed sound.
From mode7 to 3d
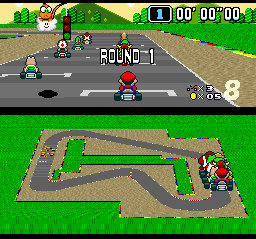
Back in the 80's when consoles and computers could only dream about 3d with reasonable speed, there was a nice thing invented. As you probably know consoles have many modes, which describe resolution, screen handling, graphics memory and many things related to display or even unrelated, as such things usually had few other restrictions. On SNES mode #7 allowed to rotate tilt and zoom layer, which was usually used to represent a flat ground. One of the typical examples is Super Mario Kart. There were tons of games, which usually shared exactly same approach to mode7, with only few introducing something innovative.
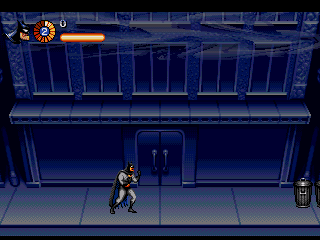
Adventures of Batman and Robin for Sega Mega Drive also used some similar technique. Since Sega didn't have any support for such things the developers had to really fiddle hard to introduce such things. Moreover they enhanced it, so it wasn't just ground, but entire screen was in perspective. The screen could only scroll left-right and there were no camera rotations in any angle.
Just side note: Such effect can be achieved even with regular plane. You first display such perspective picture, then bind scroll-x for every line with different value. That is because of how backgrounds are handled in each mode, as seen in the Video Mode Table.
| mode | 0 | 1 | 2 |
|---|---|---|---|
| bg 0 | regular | regular | |
| bg 1 | regular | regular | |
| bg 2 | regular | affine | affine |
| bg 3 | regular | affine |
It restrict you from zoom and pitch, but maybe in some cases like boss fights it won't be trouble - that way I won't have to sacrifice the available 4 backgrounds - I can use 2 regular backgrounds instead of 1 affine.
-
Total combinations are like:
- mode 0: 4 regular backgrounds
- mode 1: 2 regular and 1 affine background
- mode 2: 2 affine backgrounds
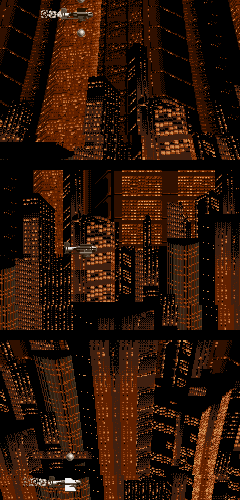
My very first tries of mode7 on Game Boy Advance were when I was doing short game called Komandor Gonzo. The math used there was heavy approximation, the code was a bit messy, everything you can expect of something did just for kicks. The basic idea was to have the screen pitching up and down while you are flying over the city. When you fly up, the desired effect should be that camera is not moving with the airplane as it is usually in shoot'em ups, but rather pitch looking up following airplane location, while still in the same position. I have used there 2 affine backgrounds to make 2 layers of buildings, further and closer. I could however make a lot more layers simply by setting points where I flip background priorities and use them as a new one, just like layered parallax works in regular video games. The only problem with that is that between such points one layer has to fully cover the second layer, it is pretty obvious, though. I think I will get back to parallax anyway.
So back then I thought to myself: Why not try to do entire 3d out of the mode 7, camera can zoom in-out, and pitch up-down. I can easily divide space with some 3d markers, which will tell where to start draw wall in different angle. Then I can use single layer to display floor, wall and roof. There are 2 such layers, so the second one will have to be used for small add-ons, like a balcony or anything to jump at. Well this is something I yet have to code.
Babysteps
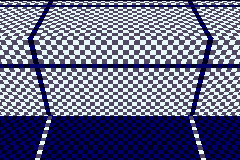
I have managed to do simple bending of geometry. There is a lot of things still missing, but there is already something like a floor, wall and a roof. The basic idea is to define geometry by placing marker points which will define how the layer segment is bent. For now each of this points has: Y,Z position, texture beginning and the angle.
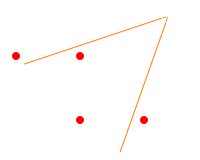
The first thing I have to do is to calculate the camera position and rotation, which will influence how the segments (walls/floors) are being drawn. The obvious limitation here is that I can only rotate camera up/down, although I am able also to rotate entire plane left/right, it won't look good at points where two segments get together.
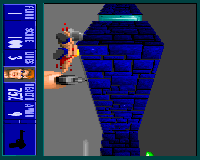
Then I have to calculate the marker positions in screen coordinates, and do some voodoo with them, so I can clearly know which wall will be drawn in which line interval. I could use a raycasting to do that. This technique was first introduced in Wolfenstein 3D by id Software for PC. Just imagine it tilted by 90 degrees. I had a fair share in such engine remakes when I was younger, so I could even extend it to some kind of distance fogging and other special effects. The only thing which is actually keeping me away from this solution is that I already did it, so maybe there is a better solution, I won't find if I don't try. In the following example I have only 3 such segments: the roof, wall and the ground and I clearly know, that I just have to draw them in that order. However in some situations, specially if one segment is hidden behind another I have to find some way to determine which segment is hidden and is it fully hidden or just partially.
The last thing I have to do is to calculate wall/floor affine matrix, so I will know how the exact segment will be drawn.
The wall
I need to find out the way to prepare the wall data for display. Mode 7
on GBA is achieved by modifying affine parameters of the display for each line at
Just side note: HBL occurs AFTER the display of the horizontal line, so we will read data from the next line at every interruption.

The final data will be an array of 160 affine values for each horizontal line of the screen. At every
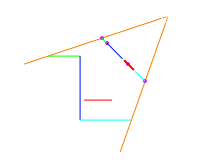
The example with roof wall and the floor is quite easy and straightforward. All walls are mutually excluding themselves, therefore we don't have to mind their priorities. Things get quite ugly when we add some walls in front of other walls. For now I solved this issue by painting layer memory with indexes from lowest to highest priority. If there won't too many overlapping layers, then the only inconvenience left will be handling walls by id's.
Working layers

After putting layers in place I have managed to add a proper texture offsets, so different parts of the wall, can have different texture regions. Zoom in/out, pitch and move of the camera works fine as you can see.
-
There are several problems illustrated by the following picture.
- First of all, we can't hide one layer behind other layer and see this from the side. The layers are handled per horizontal line after all, so there can be only one layer at the same Y position. Fortunately there are 2 affine backgrounds in GBA, so we can use both of them simultaneously, one for wall - one for balcony, or even one for roof - one for building nearby. Where we won't be able to use both layers, we will cheat.
- Second, the textures are simply a char map, they are huge, as they are affine, but they have their limits. If we zoom out too much, we will reach edges of the map. As for first plane we don't need to worry, the buildings in the background are something to be concern with. Fortunately we can zoom just texture and paint the buildings as they were far away, use sprites or color rainbow.
- Third problem is unfortunately quite troublesome - we don't have too much character blocks available. Without any tricks we only have 256 tiles, and I'm not sure yet, if there are any tricks we can use. Of course there is always dynamic loading of the tiles, but those won't change the fact, that we can fit only so little at the same time.
- Fourth, the graphics is somehow distorted. Unfortunately we can't do much about it, except trying to adjust our graphics style so it will mask this a little bit.
- Fifth, the sides of the buildings are out of the question as such. We will have to cheat a lot.
Learn how to cheat
During my IT studies I have met a lot of friends, who believed that you don't have to be really that good programmer or mathematician, because science progress and with huge probability you won't need all those algorithms and equations in your head anyway. The most important thing was to know where to find necessary materials, how to use them and how to cheat in creative way. Although they used to treat it literally, I noticed that many of them actually prove it to be right and with time some of them become even great programmers. It is not that hard to learn something by heart, it is harder to understand it, but to be creative about it so you can use it in dozen ways enhances possibilities very fast.
As a programmer you need to learn how to cheat, specially if you are game developer. You need to know where you can put something that looks like this, but in reality it is that. Even our mode 7 is nothing else than a neat trick. I will try to present some of my favorite tricks from games.
Fake transparency
If you know games like me, you probably agree that transparency is quite a new thing i graphics. Before that people had somehow to manage without it.
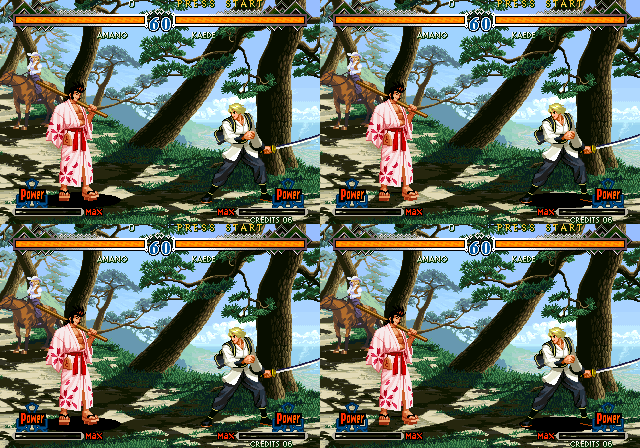
One way of doing it is to show/hide your sprite every other frame. It works well with the fast screen refresh rate, but suffers from very minor flicker. Funny thing is that if the game slowed down just for few frames, what happened every now and then, you could suddenly see one player standing on a black blob, while the other instantly turned have turned into vampire not having shadow at all.
You can see this method in almost all arcades from 80s and 90s, mostly beat'em ups. As an example I'm showing an animated screenshot from The Last Blade 2 by SNK. I'm actually animating it quite slowly, so you could see how shadow gets hidden every even frame.
The other way is to draw your graphics like on a chessboard, skipping every even pixel in every direction. If you will additionally move such graphics or change it so exactly other pixels will get drawn every even frame you can get very good results.
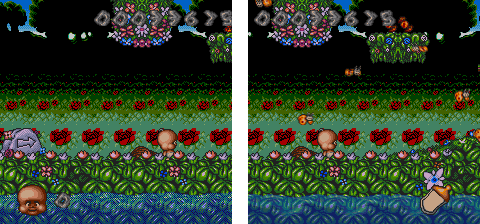
You can mostly see it in Sega Mega Drive games, probably because programmers, graphics artists or designers felt the need to compete with SNES games, where alpha blending was a part of hardware - no it wasn't a fair fight. I'm showing here Chuck Rock II by Core Design for Sega Mega Drive. Notice how water looks like it was carved in web. The second picture shows very same scene with slower refresh for animations, where water looks just like it supposed to be - transparent.
Finally it would be to use benefits of lazy drawing similar to interlace. You see, Game Boy Advance screen is updated 60 times per second, but is drawn in to passes, so in reality it is fully drawn 30 times per second. Therefore I could draw every even line one picture and every even another resulting in transparency. Additionally for such things as water or clouds I could use very same layer, using it both for level and its reflection, just drawing it in a different way.
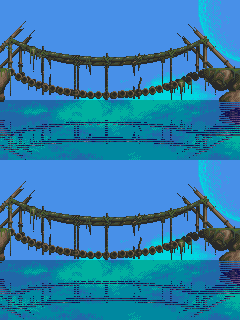
I have tried to test this effect in reality. So I'm using just 2 layers, one for backdrop, the second for both level and water. When my scanline reaches point where it is about to draw the water I first change the palette, then I continue to draw every even frame the level, but every odd I draw the reflection - same level, but just different line of it - going up through my map line per line. I have used for graphics the level from Shadow of the Beast II by Reflections Interactive for Amiga. As for background - it is a sky layer from Gunstar Heroes by Treasure for Sega Mega Drive, which, strangely enough, used this sky for similar technique for transparent scrolling 2 layers of clouds.
In conclusion I can say that there are some things definitely worth checking if I will be somehow pushed to corner not being able to use hardware alpha blending.
Water
One way to make a water is to use some blue layer and put it with some degree of transparency onto our flooded region, I guess it is a case when you have just some transparent pools, like in Super Turrican by Factor 5 for SNES. The other way is to change color palette to some sort of blue, green or grey and continue to draw the level.
You can add reflection by drawing the same graphics you have above water just in different direction skipping every time some lines so it looks parallel.
To add water ripples you can add moving slightly horizontal and vertical position of every line, regardless if it is reflection or underwater scene.
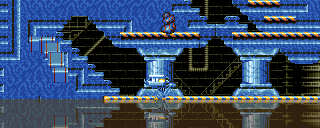
As an example I have put the screenshot from The Killing Game Show by Raising Hell for Amiga. I think it was the first game with such a nice water effect I have seen. The water was moving upwards reflecting background player character and enemies like the regular water did and I think it was pretty amazing at that time.
More info about this game at
More colors
Agony by Art & Magic for Amiga is probably one of the most beautiful games ever made. It is not only because of crisp pixel art, outstanding animation, inspired soundtrack but also because lots of tricks which made it all possible.
More info about this game at
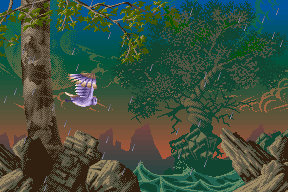
I will try to talk about colors and tricks which made it possible to use more of them than it would be possible. So here is the screenshot how it appears in game. As you can see, there is a rain in foreground. Then there are trees, rocks our hero - owl - and generally all sorts of baddies on the first plane. Behind it, we can see second plane with some trees and sea at storm. In the background we see the moon, some clouds and mountains.
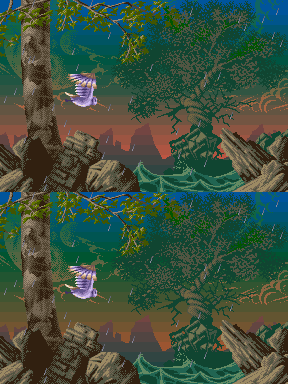
You will probably notice a faint flickering, unless of course you were born before 1985. The reason behind it is that the screen is actually drawn differently every second frame, displaying a different background colors. I'm not entirely familiar with Amiga hardware limitations like all programmers, who pushed everything they could from it. I'm not sure if the flickering was the result of 16 bit color, meaning that there was no way to draw smoother gradient, or of the timing of such color changes, meaning that colors in the background couldn't be tighter, or the amount of changes, meaning that colors couldn't be controlled well enough to make a better gradient.
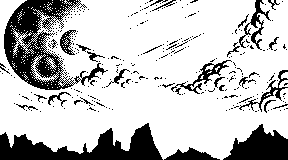

The background actually uses just 2 colors. The rainbow you see is one of the most common copper effects on Amiga, used on other platform as well using H-Blank Interrupts or DMA. Both colors are changed for every horizontal line depending on its y position. Every even frame a different set of colors is used, hence flickering.
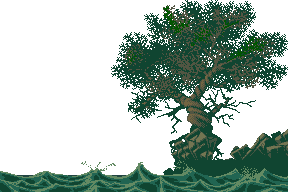

So here is very interesting example. This is a second plane. For the very first glance it looks quite innocent. But after further investigation you can notice that there are just 3 colors used! That is right, the screen is divided into 4 sections where each of them uses different colors, well at least some of them. During drawing at specific points the palette is modified so some parts can use different colors.
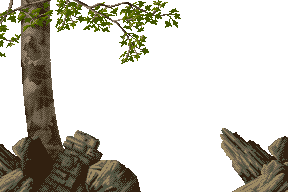

There is same thing going on with the first plane. There are a little more colors used here, well after all this is a main plane where action takes place so we have all 6 of them! The sections where colors are changed vary depending on part of the level, so graphics doesn't look all the same.
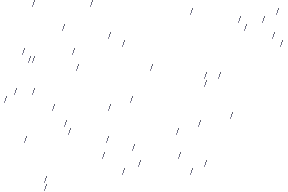
The rain itself uses colors of the main character, so there is no worry that at some parts of the screen it will be different.
Years ago I have written a tech demo using excellent HEL Library. Actually it was more out of curiosity
and to demonstrate libraries capabilities than to prove anything. If you are interested in GBA development
I recommend you to check this at
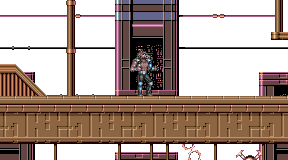
Is there anything more you can use a rainbow, apart of doing a smooth gradients in the background? Well, it depends on how creative you are. In Wolfchild by Core Design for Amiga developers created the third layer entirely out of the rainbow, creating illusion of horizontal pipes and pathways in the background.
More info about this game at
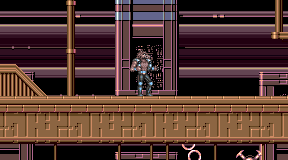

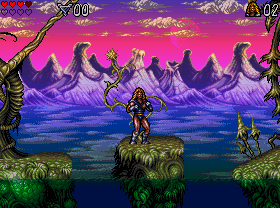
One of the most memorable examples of brilliant execution of all those aspects is Lionheart by Thalion for Amiga. There is even a fog done by color rainbow at some point in the game!
More info about this game at
Parallax
Do you remember Jurassic Park? At that time every single movie had to have at least one hungry furious running green creature, even shows for kids had to have one, just with smaller teeth and apparently more friendly. Every shopkeeper was literally drowning inside his own Jurassic 2 by 2 squared meters surrounded by plastic toy cheap dinosaurs, you couldn't even buy a train ticked without being asked if you'd like to have one dino for the go. Simply put: it was an invasion. There was the same thing happening with parallax, suddenly all developers wanted one as it was some cure for good gameplay. Well - it wasn't.
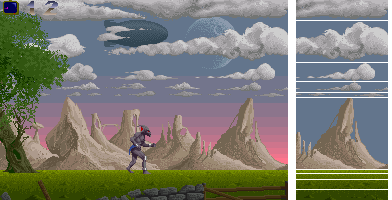
So how parallax works? Basically you have to scroll some parts of the screen faster, while other are scrolled slower. This way you create an illusion that some parts are closer to the screen than others. As an example I will use Shadow of the Beast by Reflections Interactive for Amiga which is I think most recognizable parallax example. We divide our screen into slices, then when we draw them minding that each of the slices has it's own horizontal position. On some hardware we do it simply by changing layer position in V-Blank Interruption, therefore it costs us virtually anything - no expensive calculations and only a single layer.
More info about this game at

There is very interesting approach to parallax in Jim Power in Mutant Planet by Digital Concept for Amiga. Designers made the most distant background parallax layer to stand still in place, this way player has an impression as the whole level is bent in circle around that distant point.
More info about this game at
From designers point of view it allows to put Weenie just inside the center of the level, so it always
stays in the background. Weenie is a single reference point to wet players appetite for the things to come
and more. You can find more about how Weenie works at
Another enhancement of parallax is to use 2 layers for single parallax effect by overlapping every even slice allowing transparent regions to cover one another or even moving vertically thus giving more 3D impression. You can see this in Gunstar Future Heroes by Treasure for Game Boy Advance.
Background layer or mode swap & update

There is a level in Super Turrican by Factor 5 for SNES, where we go through exterior terrain inside the mountain. Outside background uses nice parallax, while inside uses plain picture with some color glowing. Actually both backgrounds use the same layer. What programmers did there was placing some entrance which will cover fully background, then switch backgrounds. This is used very often in many games, sometimes even to switch modes. When things got really tight, programmers used even sprites as a part of decoration leaving backgrounds for 'special effects'.

Similar thing is done in Adventures of Batman and Robin by Konami for SNES. This time however the background mode is changed to affine, so the screen can rotate in selected parts of the level.
Tunnel
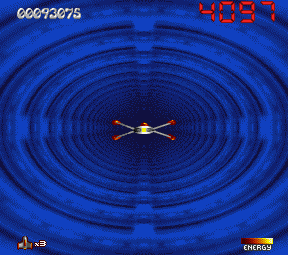
Sometimes, no matter how good programmer you are, there are things which are either too complex to be made in real time, or they actually can't be solved in a standard way. One of examples is a tunnel effect in Stardust by Bloodhouse for Amiga.
More info about this game at
Years later there was released Iridion 3D by Shin'en for Game Boy Advance utilizing very same technique.
The most impressive achievement in this field is Katakis 3D by Denaris for Game Boy Color, which shamefully haven't been released.
More info about this game at
Those games are pure shooters. To put it simply, player controls a starship flying in an endless tunnel. Camera follows starship, so it doesn't look like a simple static animation. Oh yeah, there are enemies flying in each of them.

This effect is actually easy to do. The tunnel itself is a looped animation of a quarter of the tunnel image. Such quarter is flipped and placed so when it is put together it shapes all picture. Then it is clipped to game screen so you see only part of it. This gives an illusion of flying through the tunnel. With tricky scaling and changing colors of the quarter itself there is a way to reduce size of such animation even more, furthermore as a programmer you can at least rest at ease that you did your fair share, so graphics artists won't take all the credits.
Double roof

I have added support for 2 3d layers. As you can see, we can have roofs with different heights. There is this annoying flatness because of lack of building sides and I will have to fix this somehow.
Limitations vs Me
There are several limitations which I thought I will mention now. Specially if I'm about to do something about those empty backgrounds.
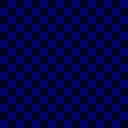
The basic area for tile graphics is 256 tiles, from which 1 tile ought to be transparent, so it will be empty. Visually this means, that I have to squeeze all my graphics used by map into rectangle 128x128 pixels.
We have 2 layers to our disposal, each of them will use such rectangle. We will probably be able to cheat a little and from time to time use the same graphics by both layers, or swap them. Most of our creative level design will focus on how to use it efficiently to provide nice level design with the convincing backgrounds. To put it frankly - this isn't plenty, so I don't want to waste it on other things than first plane.
So what about the backgrounds then? I can't just put there black nothingness, right?
First solution which comes in mind is to use some color rainbow, this could even serve as both sky and the line of buildings. It seems such a waste though. We have a lot of our VRAM empty, so lets try something different.
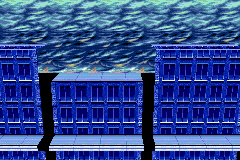
If there is a situation, that most of my empty background is visible, this means that the game action probably happens above first plane, so most likely we can do without too much graphics for it. For this upper part of the screen I will use mode 1. This will give me 2 regular backgrounds and 1 affine. The affine will be the very same background which I use for my pseudo 3d buildings. The 2 regular backgrounds will be used as sky background and everything I can think of. For regular backgrounds I can use all VRAM that is left, what is more or less 1.5 of char block. This will give me 750 tiles, or if I fiddle a little twice as much in 16 colors. When we are at the point when we are about to display both affine backgrounds I will switch to mode 2, the sky will end there while the both affine backgrounds will be visible.
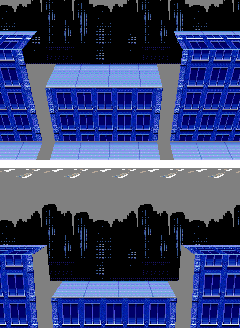
The only thing left is to do something about the sides of the buildings. First of all: let's divide our problem into 2 categories. We have to do something about the sides over the sky, and we have to do something with the space between the buildings - gray area.
For the upper part I have managed to use window. As I don't have any graphics layers I can bend or twist, I just figured, that in such case I will do the hole in the background showing what is beneath. For now there is only gray color of the background. I have one more not affine background left, so who knows maybe I will be able to put there something more. Will see.
The window itself is a little bit tricky. First of all window is a rectangle. I have to change it's shape just as I'm doing it to archive perspective effect, to put it simply: I'm drawing left/right lines which sets my window borders and change window as the screen is drawing on the fly. The other tricky thing is that on the picture I have 2 such windows. As I'm skimpy bastard I just want to use one window for that. To do that I simply define my window as end of the previous and beginning of the next window space. Works like a charm. There will be a tight spot in the future when I will have to use both windows, but for now I want to keep it - who knows - maybe I will need it to hide the sprites behind the corners.
My map editing tool & use of the data introduction
Ok, let's be honest. I like writing tools to create games. Unfortunately I usually end up moving all game into such tool and in the end there is no distinct border between the tool and the game itself. With the GBA it is different since the game has to run on console. Of course I could just make a clone version running in OpenGL and then after I'm done with the game just port it to GBA. For now however I stick with the thrill of emulators, limited debugging (if any), unknown crashes and constant cart juggling.
In order to prepare the correct data for GBA I have written a 3ds Max Exporter. Yes kids, I'm running a trial (or borrowed from work) version of it, same with the Photoshop. I love free software... if it is mature enough to work with, but if you ever want to learn something to be able to use the experience later at professional job, use the right tools. I don't think that if you are learning lets say Photoshop at home with borrowed copy you will make Adobe poorer, in fact later on, when you are professional you will even make them more customers. I know that there is a Blender and Gimp, I have already tried them. Unfortunately free software has 2 very huge flaws. First of all, it tries to be better at every point, so people put there everything they can think of. Second is that people in such communities unfortunately tend to argue about everything and can't agree with one mutual vision. This results in overcomplicated user interface (although it is all idea of how to operate with things), and uncomfortable usage. The bigger the project, the more problems it can have... and Blender or Gimp as are HUGE. But then again... it has been a couple of years since I checked them.
So I can now show one or 2 buildings, but I need to create some system to use a longer map, share data and not to overload GBA.
The art of game design
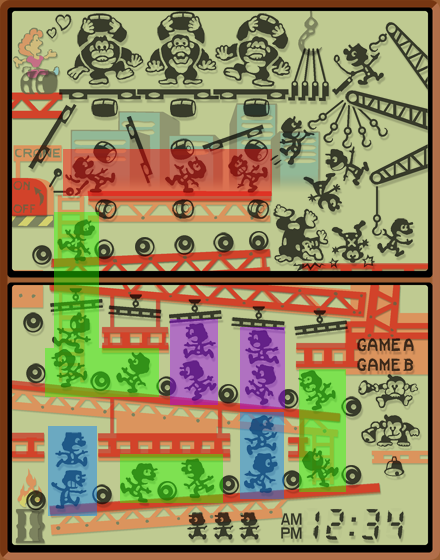
Everybody remembers from childhood Donkey Kong Game & Watch by Nintendo, unless, of course, he was 2 at that time. Actually for this day I think it is the best designed game of all the time. Having said that I will simply try to describe the game play and why I think it is so damn good.
You start the game at the bottom of the screen and instantly you see 2 things: First of all, it is quite clear, that the aim of the game is to go upstairs and do 'something' - even if at that particular time that 'something' stays hazy. Second of all, you have to start to play. There is no place here for idle and boring waiting, you have to make decision and the choices and consequences are quite obvious. You can dodge the barrels, start moving forwards or die.
When you move ahead, you will reach the spot, where you can't jump. That way player has to constantly play base to base runs, assuming his position every time before moving to the next safer place. Of course along the way every place where player can jump over the barrels gets more hazardous. At the beginning you can see all the barrels long before they reach the hero, so player can prepare his action. Later on, the way of the barrels isn't straight so it is not so clear when the next barrel will come out. At the second level there are moving things which can block heroes jump, fortunately at this spot hero can move a little further by one step, although different speed of the barrels and hooked things makes it really tricky. The next such spot is really unpleasant, since there is very short warning before moving thing comes out, same with barrels, which are visible at the upper screen, but their path is tricky and can fool the player quite easily.
@TODO: ...
Summing up: It is the limitation of character movement that makes game most interesting, Small digression here: It is really painful that modern game designers don't see that you can't just give everything everywhere. It is like those movies where there is so many things moving on the screen, that viewer can't figure out what the hell is going on there. If putting everything everywhere is so great, why simply not to put flat loud noise as a music, after all it won't be more full than that.
Actually I lied at the beginning of the description. You don't just start at the bottom. You have first to 'start playing' by pressing jump or up button. Actually I think this is the only thing which could have been done differently, specially that after beating the game you don't have that luxury. I guess the reason behind this mechanism was that it is Game & Watch game and there isn't any 'ready? go!' screen. Although my way of solving this issue would be to put at the start line hero blinking 3 times before rolling the action. But hey, maybe I'm wrong.
Showing up the buildings from the data
So how do I do in order to display the building? We have some bits & pieces already prepared, but now we want basically to follow up some kind of pipeline:
| 3d Application (our map) | > | Exporter | > | Game (map on the screen) |
Of course sometimes you might want to tweak something on the map outside your 3d Application. As for map layout itself, from my experience it is not so convenient to do so, as usually you end up in changing the map again, and then you have to tweak data from scratch or just cover the newest changes. What you might want to do instead, is to do some kind of automated converter, which optimizes your data or prepares it in 'some way' - specially if there are some loose ends on the map. During this approach your pipeline might look like this:
| 3d Application (our map) | > | Exporter | > | Converter | > | Game (map on the screen) |
For now lets stick to simple pipeline for our data. What I actually do is that I export the list of points and the list of lines (wall edges). Points will be simple positions (x,y,z) in FIXED-POINT NUMBER representation. Lines will hold indexes of 2 points and the type of the wall, as I do need to distinct the walls which will generate our layers and the walls which will be sides of our buildings. Finally I do need to divide our buildings into 2 lists, as we have actually 2 layers available, although probably more creative would be to allow map designer to decide which parts will be handled by which layer. For our first iteration we will simply do single layer.. one step at the time.
-
Technically speaking our map description will be as follows:
- Number of points -> u16
- Number of lines -> u16
- Point 1 = x,y,z -> s32,s32,s32
- Point 2 = x,y,z -> s32,s32,s32
- Point 3 = x,y,z -> s32,s32,s32
- Point 4 = x,y,z -> s32,s32,s32
- Point 5 = x,y,z -> s32,s32,s32
- ...
- Line 1 = id0,id1,type -> u16,u16,u8
- Line 2 = id0,id1,type -> u16,u16,u8
- Line 3 = id0,id1,type -> u16,u16,u8
- Line 4 = id0,id1,type -> u16,u16,u8
- Line 5 = id0,id1,type -> u16,u16,u8
- ...
When we have prepared our data like this, all we need to do is to choose which lines we will show, then we can instantly create the list of points used - that way we can calculate their real world coordinates once, even if they are shared. There are several clever speed-ups which we will include in the code. First of all if we sort our lines from left to right (by the further left or right end), we can keep the index of the last known line on the screen and just check the next one for appearing onscreen, not all of them. Similar way we can dispose of the lines which have left the screen.
Showing up the buildings from the data - First Encounter
Lets test if our routine will work. First we create some boxes, a little far apart so we can test window routines.
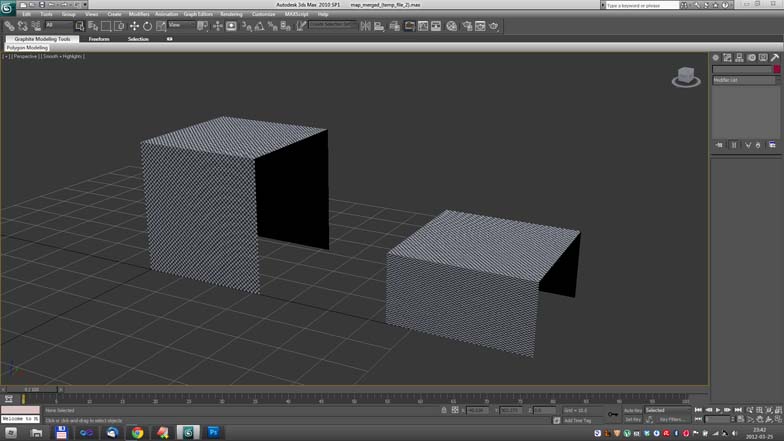
Now I export the data. For my debugging purposes I'm doing it as typical const arrays. As expected there is vertex table, which holds X, Y, Z coordinates of every point. Faces are described as index arrays, every face is described as 4 indexes which point to vertices. The interesting part is MAP_SLICE definition. I'm not sure if this kind of data organization will stay this way, but for now it describes horizontal parts of the level, hence the name. It looks more or less like this...
const VECTOR map_vertex[ VERTEX_NUM ] =
{
	{ 0,    0,  -32 },                       // first box
	{ 32,   0,  -32 },
	{ 0,    32, -32 },
	{ 32,   32, -32 },
	{ 0,    0,    0 },
	{ 32,   0,    0 },
	{ 0,    32,   0 },
	{ 32,   32,   0 },

	{ 64,   0,  -32 },                       // second box
	{ 96,   0,  -32 },
	{ 64,   16, -32 },
	{ 96,   16, -32 },
	{ 64,   0,    0 },
	{ 96,   0,    0 },
	{ 64,   16,   0 },
	{ 96,   16,   0 },
};

const FACE map_index[ FACE_NUM ] =
{
	{ 0,  2,  3,  1,        0, 8 },          // back
	{ 6,  4,  5,  7,        1, 512-304 },    // roof
	{ 2,  6,  7,  3,        0, 184 },        // front

	{ 8,  10, 11, 9,        0, 96 },         // back
	{ 14, 12, 13, 15,       1, 160 },        // roof
	{ 10, 14, 15, 11,       0, 0 },          // front
};

const MAP_SLICE map_slice[ SLICE_NUM ] =
{
	{ 0, 3 },                                // first box
	{ 3, 3 },                                // second box
};
The entire level consists of 2 planes made from our affine backgrounds. Each plane is put together horizontally from slices, and slice is formed vertically by a few folds. More or less it looks like a snake.
Some tests with complexity
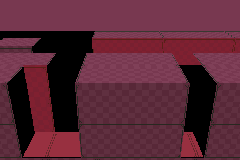
After long break I finally had a chance to upload one of my many tests. This time the scenery consists of huge containers stacked one on another. The main reason of this is to check how engine would behave if we have more than one layer depending on the progress. I didn't use windows to trick the sides of the containers in this - too much to bother and I wanted to see all the graphics. I think this might be the most complex scenario envisioned in the engine as it comes to mode7 layers without any additional tricks. Of course things can be tweaked a little bit, walls rearranged so actually you can see a little more of it. But as I said - this is just a test.
Some ideas
Game look
The game itself should look steampunk. I'm not sure at this point about specific time period and actually I think it will end up as being otherworldly timelessness. The main idea is to borrow features and villain equivalents from different periods of time around 1900.
-
Characters:
Joker
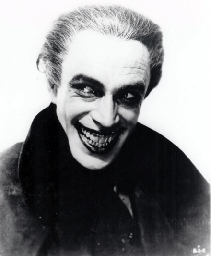
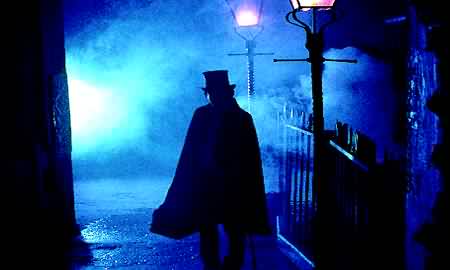
I would like to portrait The Joker as the title character in silent film directed by Paul Leni - "The Man Who Laughs". I had always a soft spot for German Expressionism and the fact that there are rumors about Joker being based upon hero portrayed by Conrad Veidt gives it all quite a nice touch. I can see opportunity to introduce Joker as a Jack The Ripper as being an unidentified serial killer.
Music Theme: Masaaki Nishizawa - Super Bonk (SNES) - Opening.
Two-Face (Harvey Dent)
This is very straightforward. Jekyll & Hyde is a perfect classic story which will substitute Two-Face.Scarecrow
Music Theme: I think I will go for something Gospel/Country for its undertaking feel. Noted down Johnny Cash - God's Gonna Cut You Down, of course to be more faithful to my own tasted, I also noted Ministry - Scarecrow.Penguin
Music Theme: James Pond theme. It was so unbearable to listen, yet fun.- ...
- ...
Sprites
The sprites is a funny technology. At first it supposed to help programmers to develop their moving objects so they won't have to redraw graphics. On some systems it was the major horsepower, while on other it is so limited, that developers tend to roll out their own solutions. Some systems can use more sprites, varying in amount of colours, they can be bigger or smaller. The biggest problem was however the limit of the amount of sprites in the single row. On modern consoles and computers there are no REAL sprites at all, instead we do have moving flat geometry with the texture of our moving image.
On our target system, which is GBA, we have kind of a middle ground. There are limitations, though there is a lot we can do. There is more enough of them for our game and they can be as small as 8x8 pixels up to the half of our screen. Furthermore we can rotate and scale sprites.
There were several approaches to the moving objects itself. The base line was to get most from it.
The straightforward approach was to simply use the single sprite per moving character. Good grapfics artist will use up most of the sprite space. After all, if we won't use up the gfx space we are not only wasting precious memory but also use up sprites area, remember: empty pixels do count too!

The typical example of such sprite is a main character of Rick Dangerous by Core Design. You can see exactly how the Rick character fits perfectly a square of 24x24 pixels. I have included the whole animation sheet so you can see that none of the images is larger than the given limits.
More info about this game at
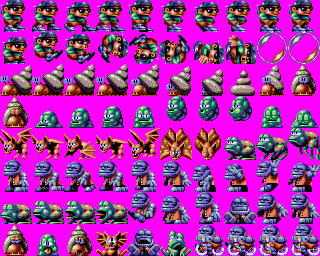
The best example of fully using up the rectangular area of the sprite is Magic Pockets by Bitmap Brothers. Every character frame presented here fits exactly in 32x32 pixel square. There were other graphics too, though they were used in special cases which I won't cover in this example.
More info about this game at
You can ask me why I did put all those characters on a single pink rectangle. Now this is interesting, I didn't just put together all those sprites just to show you how they look. In fact, this is a sprite sheet, which developers call an atlas. Such atlas is loaded into memory and our game when is about to draw some graphics, just fetches the appropriate cells from it. Some people may tell you that this is a rather new invention used because of some speed limitations coming from modern 3d cards (I will get to it somewhat later). Your friends are wrong. In fact this concept was heavily used in 8 and 16 bit consoles and computers. In fact the supplied image is taken (almost) directly from the game file - looks like an atlas to me. Such sprite sheet was loaded into Video RAM (VRAM in short) as Character Map to be used by display system. Console programmers had it easy, they just needed to specify the top-left (well, actually it was the memory address, but it is the same thing) corner of the sprite and all the magic was done by the hardware itself. Computer developers, without dedicated hardware had it much harder. Whole displaying had to be programmed from zero. There were several approaches to filling the VRAM. Some developers used prepared and pre-calculated atlases. Others filled it dynamically only when needed - this is more sophisticated but also time consuming.
Now back to this pink color. As you already know, the older hardware didn't have millions of colors and tons of memory for it. Well, even if the hardware would be able to display millions of colors, the main limitations is a memory. The modern graphics is stored pixel by pixel, where every pixel is described as color in RGB components (amount of red, green and blue). Every component takes up some data, that is why in most of graphics software you can see the picture settings like 8/15/16/24 bit color. Additionally as an extra component there is usually added opacity value, usually referred to as alpha.
-
There are actually a many ways to describe the color:
- 8 bits - Usually means it is a grayscale image and every pixels greyness is kept in 8 bits.
- 15 bits - Describes color as 5 bits for red, 5 bits for green and 5 bits for blue.
- 16 bits - Describes color as 5 bits for red 6 bits for green and 5 bits for blue. Green is usually chosen to have an extra bit because human eye has better sensitivity for this color. After all it is the most common color in nature.
- 24 bits - Sometimes referred to as "truecolor" - 8 bits for red, 8 bits for green and 8 bits for blue.
Single pixel is not much, an image 16x16 pixels is acceptable, but entire screen, even in low resolution is a lot. That is why older or limited hardware uses different approach. Instead of describing the screen pixel by pixel, designers decided to use palette and color indexes. Such palette would contain a description of every color used in the picture. The image itself would be composed of indexes to color in palette. The maximum amount of colors used equals the highest possible color index and is mostly in direct connection of the image size in memory. The indexed approach is not only limiting the number of colors used. It makes such things as transparency very hard. That is why most systems simply use some special color as transparent, usually it is at index 0. The color of such transparent index is not important, in normal circumstances it won't be drawn anyway. To distinct this color, its palette value is usually set to something not used very often. So unless you are doing some girls game, it will be in your sheets as pink.
So all we have to do is to draw our atlas. In fact I have to admit that I have spent a fair amount of time putting together atlases. First by hand, later by some homemade tools. The atlasing is a complex problem. Simple algorithms like SkyLine can provide good results but sometimes you need something more sophisticated. That is the main reason why most developers use some advanced tool to do atlasing for us. One of such tools is
TexturePacker
I have to admit: I'm fairy fresh to TexturePacker but as soon I laid my eyes on it, I was very impressed. The ease of use is almost as the textures packed themselves. The amount of settings allows us to control almost every aspect of our atlas. The tool is truly powerful.
This is how TexturePacker looks like. There are great tutorials on the main tool page so be sure to check it out. Meanwhile we will focus on practical use.
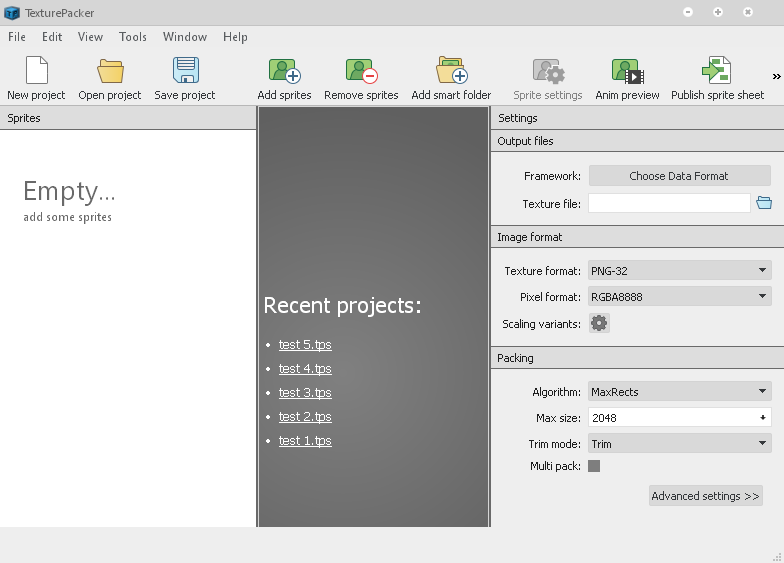
On the left side there is a Sprites window. You can drag there your sprites one by one to add them to your atlas. What I actually recommend you is to use folders instead. By keeping all your atlas images together in a single folder you put all the hard work on TexturePacker, which will keep track on all changes to your files for you. Believe me, during development you will occasionally change filenames, remove some of them and add the others.
On the middle you can see how the atlas actually looks like.
Additionally you can click on image to set some individual settings. The list of settings is limited and I hope developer will add some more features.
Now there is one important thing to remember - single sprite sheet can have several atlas images. This feature is called Multipack in TexturePacker and you have to be very careful and check if your game engine supports it. If Multipack is enabled and if you have populated the whole atlas image area and still didn't fit all the images, TexturePacker will add next image for the rest of your sprites. In our game (engine) we will support Multipack as it is fairy easy to implement and doesn't cost us much.
The right column is where the heart of your atlas is.
First important thing to remember is that TexturePacker operates in Basic Settings and Advanced Settings mode. You can switch between them by pressing appropriate button at the bottom. Lets just go to advanced mode right away, so we can have better control.
Second important thing to note: atlasing options are dependent on the Data Format. This means that some settings are not available in specific engines so it is always better to first choose your engine - just click on Choose Data Format button to see the list of available export formts. For our purposes JSON (Array) is perfect. We can inspect the export data in text editor later and see what is going on under the hood. We will later write our own exporter, but for now it will suffice.
-
So to sum things up for now:
- use folders
- an atlas (group) doesnt has to be a single image
- use few separate atlases for specific parts of the game so you can load them independently
- be a pro, use Multipack
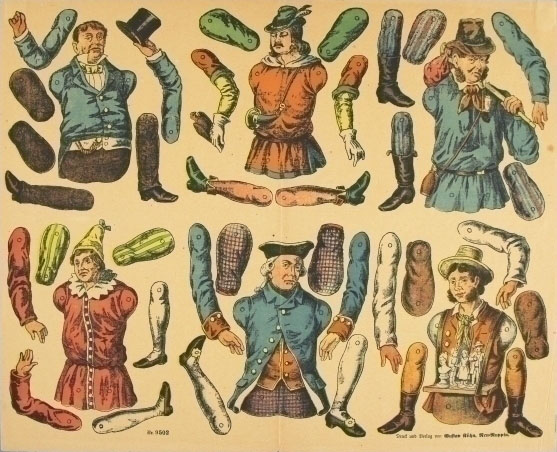
Now lets say we don't want to have blocky rectangular characters. The easiest way to achieve this is to put several sprites into one single character. We can then animate all body parts separately by rotating them or replacing their graphics. This isn't recent idea, in fact paper dolls were used far before anyone would even think about thing like computer, you can check "pantin" paper dolls as an example. The very same technique of animation is used in modern 3d games. The only difference is that modern 3d models use thing called "skinning", instead of using separate parts, a single 3d mesh is used and is bent where and when necessary.
Photo courtesy of www.museumofplay.org, also if you interested check www.ekduncan.com.
TODO: The best way to check out this technique would be to launch Red Sector's Demo Maker. The tool was released in 1991 for Amiga and was widely used by 3rd parties to do fancy demos.
TODO: Console limitations. Screens.